Abstract
This post presents the research conducted under the domain of dynamic processor mode (or context) switching that takes place prior to the invocation of kernel mode functions in 32bit processes running under a 64bit Windows kernel. Processes that are designed and compiled to execute under a 32bit environment get loaded inside the Windows-on-Windows64 ( WoW64 ) subsystem and are assigned threads running in IA-32e compatibility mode ( 32bit mode ). When a kernel request is being made through the standard WoW64 libraries, at some point, the thread switches to 64bit mode, the request is executed, the thread switches back to compatibility mode and execution is passed back to the caller.
The switch from 32bit compatibility mode to 64bit mode is made through a specific segment call gate referred to as the Heaven’s Gate, thus the title of this topic. All threads executing under the WoW64 environment can execute a FAR CALL through this segment gate and switch to the 64bit mode.
The feature of mode switch can also be viewed from the security and maliciousness point of view. It can be used as an anti reverse engineering technique for protecting software up to the malicious ( or not ) intends of cross process generic library injection or antivirus and sandbox evasion. The result of this research is a library named W64oWoW64 which stands for Windows64 On Windows On Windows64.
Introduction
Within the WoW64 environment, threads that wish to switch between compatibility mode ( 32bit mode ) to 64bit mode, in order to request the invocation of kernel mode functions, have to go through the Heaven Gate located at code segment selector 0×0033 that identifies the call gate inside the GDT. The process of context switching occurs multiple times throughout the lifespan of a WoW64 process and is essential for their compatibility with the Windows 64bit kernel. However, this feature creates a number of minor security issues or inconsistencies to security or software analysis products. Over the next paragraphs, we will explore the methodology used by the operating system when user mode applications engage in the invocation of kernel functions as well as the differences between the two modes from the perspective of a thread. Next we shall explore how context switching can be used by 32bit malicious processes to communicate, control and inject libraries in 64bit mode applications using a library created just for this purpose.
Research Laboratory
This research was conducted on a Windows 7 64bit Operating System with all updates and patches installed as of ( see post date ). The tools used are:
| Name |
Usage |
Link |
| WinDBG x64 |
Used for debugging sessions between contexts |
Download |
| Visual Studio C++ 2010 |
Used for compiling the POC code |
Download |
Tracing to Heaven
Before we get our hands dirty, we need to briefly dive into the Windows mechanisms of calling the heaven gate. To do this we need to understand how the gate is used, the reasons, as well as what happens when we switch to 64bit mode.
To begin with, we shall trace a call to ZwTestAlert. You can do this by loading any 32bit application on a 64bit Windows operating system and issuing the following command on the first LdrpDoDebuggerBreak breakpoint.
bp ntdll32!ZwTestAlert
Note that the breakpoint is set for ntdll32 which is the 32bit WoW64 version of the ntdll library. If by any chance you’ve set a breakpoint using the bp ZwTestAlert command then you’d be setting it to the 64bit ntdll version of the library. Before we go any further let us check the modules currently loaded in memory. For this example the POC executable HeavenInjector.exe was used and the lm ( list modules ) command was executed with the result illustrated in Figure 1.

Figure 1: Default Loaded Modules
As you can see there are two versions of the ntdll library, one being the 32bit one and the other the 64bit one. Along side the executable we can list three other libraries which depend on the processor architecture currently being used by your system. It is worth noting that the test OS is running on AMD64.
Execute the program using the g command or the F5 key until you reach the breakpoint we’ve just set. You can view the disassembly code of the ZwTestAlert function by hitting u ( which disassembles 8 instructions from the current address or 9 instructions if your platform runs on an Itanium processor. ) [1] or by bringing up the Windbg’s Disassembly window from View > Disassembly. The code is shown in Figure 2.

Figure 2: ZwTestAlert Disassembled Code
On a 32bit Windows 7 version the above function looks slightly different ( See Figure 3 ).

Figure 3: ZwTestAlert 32bit Disassembled Code
An obvious difference between the two Operating Systems is the SYSENTER instruction located at SharedUserData!SystemCallStub which is not present in the WoW64 ZwTestAlert function ( Figure 2 ). That instruction is replaced with a CALL instruction to a pointer located in fs:[0C0h]. On Windows 32bit processes the fs segment holds the address of the TEB for the current thread and the 0C0h value signifies the offset from that address to the value that is being read. To view the current TEB address we need to issue the !wow64exts.info command as shown in Figure 4 below. Note that the Windbg pseudo register $teb holds the address of the 64bit TEB for this thread.

Figure 4: WoW64 Information
The value TEB32 contains the address of this thread’s TEB. We note that value and issue the dt command to dump the TEB structure, along with any values, into the command window. To do this we execute the following command:
dt _teb 7efdd000
Where _teb is the symbol of the 32bit TEB and 7efdd000 is the address of the 32bit TEB. The resulting output should be similar to the one shown in Figure 5.
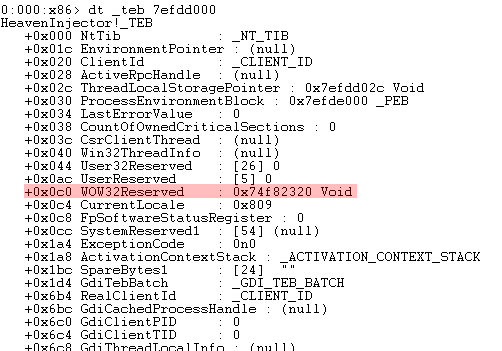
Figure 5: TEB32 Of Main Thread
As you can see the offset +0x0c0 points the the WOW32Reserved field which contains the address 0x74f82320. All WoW64 calls to the kernel are being redirected to this address. If we disassemble any other ntdll32 functions such as ZwOpenProcess, NtLoadDriver, etc we can see that the same CALL instruction with the same address is called.
Continuing the execution of the program and tracing into the call dword ptr fs:[0C0h] instruction by hitting F11 or typing t into the command window we end up at the address pointed to by the WOW32Reserved field which lands inside the wow64cpu library at function X86SwitchTo64BitMode as shown in Figure 6.

Figure 6: wow64cpu!X86SwitchTo64BitMode
The above instruction jumps to the given address of the code segment through a specified segment selector call gate. Intel’s specification [2] refers to this instruction as a FAR Jump instruction which if it’s segment selector ( in this case 0×0033 ) is a call gate then then the code jumps to the code segment specified in the call gate descriptor ( which is located in the GDT ) and executes the code pointed to by the gate, if the segment selector is for a code segment then a far jump to the segment is performed. which in this case handles the switch from 32bit to 64bit.
When we trace the JMP instruction we end up being in 64bit mode at the address pointed to by the instruction. The address contains the entry point of the wow64cpu!CpupReturnFromSimulatedCode function ( as shown in Figure 7 ) which in short, sets up the environment for the current system call and executes the SYSCALL instruction. Once finished, all results are normalized for 32bit mode and the function returns back to the initial 32bit system call shown in Figure 2.
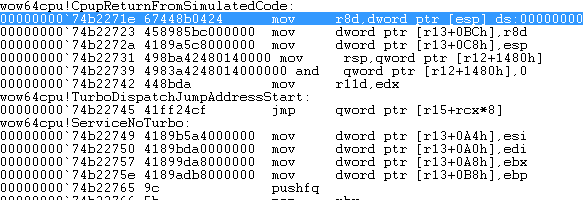
Figure 7: WoW64cpu!CpupReturnFromSimulatedCode Entry
For the purposes of this research a short assembly algorithm was devised to understand the effects of a FAR CALL instruction through the heaven gate. The algorithm is shown below:
| Label |
Instruction |
| main: |
CALL FAR 33:x64code |
| x64code: |
RETF |
When this algorithm was executed the value pushed by the far CALL instruction within the stack revealed an additional segment selector call gate 0×0023 (which is actually the 32bit code segment we just came from) who’s purpose is to switch from the current 64bit mode to the compatibility 32bit mode. Figure 8.1 Illustrates the top of the stack right after the CALL. As you can see the last four (4) bytes 0x004011c3 contain the return address whereas the preceding two (2) bytes 0×0023 contain the segment selector call gate number.

Figure 8.1: Heaven Gate After-CALL Return Address
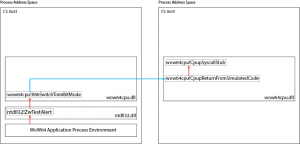
In conclusion, the process of switching modes is required for the communication between the WoW64 processes and the windows kernel. Figure 8.2 below illustrates the process discussed in the above paragraphs.
WoW64 ZwTestAlert Call x64 Switch Illustrated
After-Switch Environment
Before we begin abusing the heaven gate, we need to understand the post-switch environment of the thread including which libraries are loaded and how we can reconstruct it in such a way allowing us to execute any 64bit compiled code or libraries.
To begin with, we need to locate all 64bit libraries loaded along side the executable. We can identify them using the lm command as shown in Figure 1 then using the !dh command in conjunction with the address of a library to dump it’s headers. Figure 9 illustrates this process for a single library wow64.
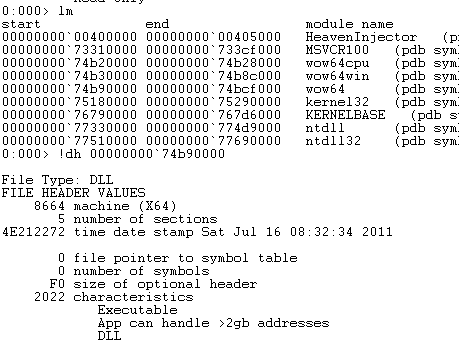
Figure 9: Retrieving wow64 Headers
Switching from 32bit to 64bit does not cause any other libraries to be loaded, therefore we reach to the conclusion that only the following libraries are accessible and loaded for the 64bit mode of this process. We can verify this by first dumping the 64bit PEB structure using the following command:
dt ntdll!_peb @$peb -r
Next we locate the Ldr.InLoadOrderModuleList.Flink address and issue a !list command listing all libraries currently loaded for this process. Figure 10 shows the PEB structure.
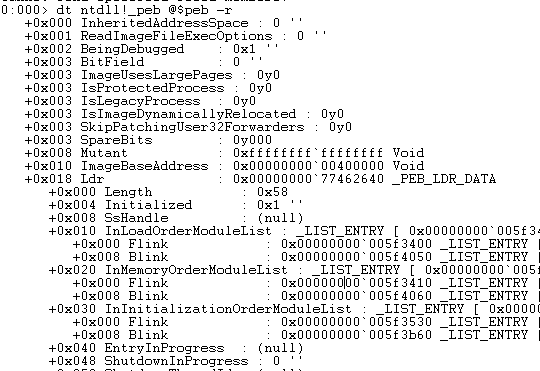
Figure 10: 64Bit PEB Structure
To issue the !list command we need the address of the first InLoadOrderModuleList entry which is the Flink entry located at address 0×00000000`005f3400 in the above figure. Next we issue the following command to dump the linked entries in the InLoadOrderModuleList chain:
!list -x “dt _LDR_DATA_TABLE_ENTRY” 0×00000000`005f3400
The resulting output should list the libraries we are seeking. Therefore, when switching to 64bit mode the current process environment is running with the following:
- In 64bit Mode
- Has the following libraries loaded ntdll.dll, wow64.dll, wow64win.dll, wow64cpu.dll
- Has separate TEB and PEB structures than the 32bit process
Unfortunately, our initial goal to execute any code or libraries within that environment lacks one key element. When a process is loaded, the loader first loads the ntdll.dll library and right after that the kernel32.dll library. In our case kernel32.dll is never loaded within the 64bit environment. Therefore, we need to load the library using the LdrLoadDll function located within ntdll.
Issue 1: Aligning the stack for 64bit mode
Another issue that might come up with the execution of certain functions is the issue of maintaining the stack alignment between modes. When switching to 64bit mode the stack register ESP, or in this case RSP, retains it’s original value aligned on a 32bit boundary. In order to overcome this issue all we have to do is “waste” enough bytes to align the stack for 64bit execution then realign it before switching back to 32bit mode.
Issue 2: Identifying and calling ntdll API functions
After crossing the heaven’s gate, the environment we come across is no different than the unknown environment of a simple shellcode environment. This means that our code has no prior knowledge of function pointers or environment variables. In order to overcome this issue we would have to walk the PEB table, identify the address of the ntdll library and then locate the necessary functions for the successful execution of our payload.
Issue 3: Loading Kernel32.dll – Understanding The Constraints and Protections
Any attempts to load kernel32.dll using the LdrLoadDll function would result to the error code 0xC0000018 ( STATUS_CONFLICTING_ADDRESSES ). This is due to the fact that the default memory location of kernel32 is already mapped as private. Therefore, when LdrpFindOrMapDll attempts to map the section of the image using LdrpMapViewOfSection a process of walking the VAD tree is initialized resulting to a conflicting address between the library’s preferred base and a privately allocated page at the same address. That page is located at the original kernel32.dll base address and is placed there to prevent loading the library from a WoW64 environment. LdrpMapViewOfSection ends up loading the library at a different base and returns STATUS_IMAGE_NOT_AT_BASE. This triggers an algorithm within LdrpFindOrMapDll function that ends up comparing the library string provided by our call to LdrLoadDll with the string located at ntdll!LdrpKernel32DllName, which contains the unicode string “kernel32.dll”. As a side note, it is worth mentioning that the exact same processes occurs when loading the user32.dll library. The algorithm’s purpose is to identify whether the system library kernel32.dll has not been loaded at it’s preferred base address and if so unload it and return the conflicting addresses error.
In order to solve this issue, one could employ a simple hooking technique to redirect execution from the string comparison function RtlEqualUnicodeString to a stub function that would force RtlEqualUnicodeString to return a negative answer which would in turn result to the OS loading the kernel32.dll library at any base address. This however is not a complete solution since certain functions contained within ntdll require numerous structures from the library that are referenced using their absolute address. In addition the kernel32 library’s initialization function KernelBaseDllInitialize ( which is also the EP of the library ) would fail to execute and raise an unhandled exception in the process. Therefore, loading kernel32.dll at any base address except the one specified by the operating system is a bad idea.
Loading kernel32 at its original base address requires an understanding of the methodology used to load a 32bit executable within the WoW64 environment. It is essential for us to identify the protections placed by the loader so that they can be overcome.
When running the 64bit version of WinDbg the first breakpoint you come across is hit by the 64bit ntdll!LdrpDoDebuggerBreak function prior to the invocation of any wow64 processing. If you hit F5 or type g in the command line you view an output similar to the one shown in Figure 11.

Figure 11: WoW64 Initialization
If you compare the addresses of the NOT_AN_IMAGE and the first WOW_IMAGE_SECTION with the modules loaded in a 64bit application such as calc.exe (as shown in Figure 12 ) you will immediately identify that those locations are actually the system wide base addresses for the kernel32.dll and user32.dll libraries. However, if you execute the lm command at the 32bit executable’s EP those modules are no longer registered within the loader data table entry inside the PEB.

Figure 12: calc.exe Initial Loaded Modules
In order to identify how these pages are allocated and assigned at the loader table we need to trace the execution following up the first breakpoint ( in 64bit ntdll!LdrpDoDebuggerBreak ) we come across. Therefore, we hit F10 or p until we reach the CALL instruction pointing to ntdll!Wow64LdrpInitialize as shown in Figure 13.

Figure 13: Call to ntdll!Wow64LdrpInitialize ( wow64!Wow64LdrpInitialize )
This function, located within wow64.dll, is responsible for initializing the 32bit Wow64 subsystem such as the 32bit ntdll.dll, calling the function that initializes filesystem redirections and so on. Since we are only interested at the initialization of the page, we trace through its code until we reach the CALL to wow64!ProcessInit as shown inFigure 14.

Figure 14: Call to wow64!ProcessInit
This function’s responsibility, amongst other, is to load the debug wow64log.dll (which does not exist on production systems) for debugging purposes, initialize filesystem redirection and most importantly, make our work slightly more difficult by mapping the addresses of the libraries we wish to load. The wow64!InitializeContextMapper function call ( shown in Figure 15 ) is responsible for mapping the firstWOW64_IMAGE_SECTION for kernel32.dll and looking up the export table of the library ( which falls outside the scope of this research ).

Figure 15: Call to wow64!InitializeContextMapper
We Trace over wow64!InitializeContextMapper until the point where we come across wow64!Map64BitDlls (as shown in Figure 16 ) who’s purpose is to setup the environment is such a way thus denying the mapping of our libraries to their original system-wide default base address.

Figure 16: Call to wow64!Map64BitDlls
Tracing through that function we hit the first interesting CALL instruction which points to ntdll!LdrGetKnownDllSectionHandle ( as shown in Figure 17 ). Unfortunately, looking up this function in your favorite search engine does not produce any significant results ( at least to the eyes of the author ). Therefore, the function prototype and purpose is explained in the followup paragraph.

Figure 17: Call to ntdll!LdrGetKnownDllSectionHandle
LdrGetKnownDllSectionHandle receives three arguments, first a pointer to the variable which holds the Unicode name of the library ( or section name ), a Boolean flag which dictates which directory handle should be used when loading the section. TRUE for the Wow64 directory containing the 32bit versions of the library requested and FALSE for the 64bit version directory. Finally the last argument is a pointer to a variable which would receive the handle of the section. Note that this function is essentially a wrapper for the NtOpenSection routine. The function’s prototype is defined below:
NTSTATUS LdrGetKnownDllSectionHandle(
LPCSTR lpwzLibraryName,
BOOL bIs32BitSection,
HANDLE * lphSection
);
Given what we know now and what is illustrated at Figure 17 we can safely deduct that the wow64!Map64BitDll function retrieves the handle of the section used to map kernel32 throughout all processes. Next, that handle is used to call the ntdll!NtMapViewOfSection [3] function as shown in Figure 18. Note that at the same figure, at address 00000000`74c59ded the pointer to a unicode string which reads “NOT_AN_IMAGE” is moved to the quad word pointed to by r13+28h, where at this specific location r13 holds the address of the 64bit TEB and offset +28 contains the ArbitraryUserPointer within the TIB structure.
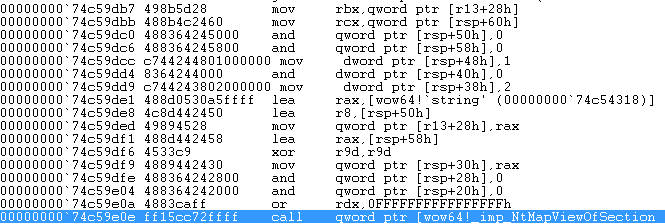
Figure 18: Call to ntdll!NtMapViewOfSection
So far we have deducted that wow64 loads the section of kernel32 into memory at it’s correct base address ( also verified by the return value of NtMapViewOfSection ) and named after the string put in ArbitraryUserPointer prior to the invocation of NtMapViewOfSection. Immediately, and right after the call to the mapping function, the section’s handle is closed and the freshly mapped section is unmapped using the NtUnmapViewOfSection function. The reason for mapping and unmapping the section becomes obvious over the next few instructions which are the cause of our original problem with kernel32. The proceeding function call to NtAllocateVirtualMemory [4] ( as shown in Figure 19 ) receives as arguments, you’ve guessed it, a pointer to the original base of kernel32.dll, an AllocationType of MEM_RESERVE and Protect of PAGE_EXECUTE_READWRITE.

Figure 19: Call to ntdll!NtAllocateVirtualMemory
Next, the function re-iterates using “user32.dll” as known section handle and proceeds with executing the same algorithm of allocating the memory page. Once finished, the function returns towow64!ProcessInit and the initialization process continues.
The above paragraphs have walked us through the process of protecting the pages where crucial libraries are supposed to be loaded at. However, since the protection placed is just a memory allocation, it can be overcome by simply freeing that memory page. 
Constructing The Payload
Over the next few paragraphs, we shall describe the payload stub’s code which is responsible for overcoming the issues identified above. Henceforth, whenever we refer to the payload, we refer to the piece of 64bit code that executes right after passing through the heaven’s gate.
Solving Issue 1
Before we begin doing any library loading we need to align the stack on a 64bit boundary. This means that the stack needs to be aligned on an 8byte boundary from it’s base. For example, if the stack is allocated at address 0×00000000’00100000 then all proceeding elements should be referenced at multiples of 8 resulting to a stack which resembles the following structure:
| Address |
Element |
| 0×00000000’00100000 |
StackBase+0 (0) |
| 0×00000000’00100008 |
StackBase+8 (8) |
| 0×00000000’00100010 |
StackBase+10 (16) |
| 0×00000000’00100018 |
StackBase+18 (24) |
| … |
StackBase+20 (32) |
| Bottom of Stack |
StackBase+X |
Additionally, any modifications to the stack need to be backed up so the stack can be realigned back to it’s original 32bit boundary. The solution is rather simple, since the 64bit alignment allows only the first 61 bits of the stack pointer value to be set then the last 3 bits have to be discarded. In order to understand this, let us have a look at some binary values along with their hexadecimal representations as well as what happens when we take away the last three bits of that value:
| Binary Value |
Hex Value |
Without Last 3 Bits |
| 0000 0001 |
0×01 |
0000 0000 (0×00) |
| 0000 0011 |
0×02 |
0000 0000 (0×00) |
| 0000 0100 |
0×04 |
0000 0000 (0×00) |
| 0000 1000 |
0×08 |
0000 1000 (0×08) |
| 0001 0000 |
0×10 |
0001 0000 (0×10) |
| 0011 1001 |
0×39 |
0011 1000 (0×38) |
As you can see when taking away the last 3 bits of each value, it becomes 64bit aligned. In order to code this in assembly all we require is the AND and SUB instructions as follows:
| MOV RAX, RSP |
Move the value of the stack pointer RSP to RAX. |
| AND RAX, 07h |
Logical AND RAX with value 07h ( first 3 bits set ). |
| CMP RAX, 0 |
Compare RAX with 0. |
| JE main_stack_ok |
If RAX is 0 ( none of the 3 first bits are set ) then stack is already aligned. |
| SUB RSP, RAX |
“Waste” or remove any of the three last bits that are set. |
| MOV bStackAlignment, al |
Store the number of bytes we just subtracted into a local variable. |
Then at the end of the function we add the subtracted bytes from the local variable bStackAlignment to realign the stack pointer back to it’s initial value as shown below:
| ADD SPL, bStackAlignment |
Add to the lower byte of RSP the value we subtracted when aligning the stack |
However, for the purposes of the W64oWoW64 library the lower two (2) bytes of the ESP register are ANDed with the value 0xFFF8 ( since the Visual Studio MASM compiler doesn’t like referencing the lower byte of the stack register SPL ).
Solving Issue 2
In order to prepare the environment for the execution of arbitrary code or library we need to retrieve a number of API functions located in the 64bit loaded ntdll library.
- LdrLoadDll – In order to load kernel32.dll and a payload library compiled for x64.
- LdrGetKnownDllSectionHandle – Which will be used to retrieve the section handle of kernel32.dll and user32.dll in order to retrieve their original base address.
- NtFreeVirtualMemory - Which will be used to free the original library base address memory page that was allocated by wow64!Map64BitDlls.
- NtMapViewOfSection – Which is used to map the section retrieved by LdrGetKnownDllSectionHandle at a random base address so we can retrieve the library’s original base address from the PE Header.
- NtUnmapViewOfSection – To unmap and clean up the memory after the original base address of the library has been retrieved.
In addition to that, the addresses of the following libraries are required:
- ntdll.dll Base Address – Which can be retrieved from the PEB.
- kernel32.dll Base Address – Which is returned by the LdrLoadDll call or can be accessed through the PEB.
For the purpose of retrieving the base address of the ntdll library, a function named GetModuleBase64 was devised and implemented. You can find this function in w64wow64.c which is attached to this post. It receives the library name and returns base address of the library. Implementation details for this function can be found in the source code. For the purposes of this post all you need to know is that the function retrieves the PEB of the current thread and walks the Ldr.InLoadOrderModuleList chain to retrieve the library base.
Additionally, retrieving function pointers from libraries is made possible with the use of another function in the same file named GetProcAddress64. This function receives the module base as first argument and the API function name as its second argument. The function walks through the PE header of the provided module, loads up the IMAGE_EXPORT_DIRECTORY and identifies the function.
The following code within the InitializeW64WoW64() function is self explanatory, its purpose is to resolve the address of ntdll.dll and the first required functions LdrGetKnownDllSectionHandle, NtFreeVirtualMemory, NtMapViewOfSection, NtUnmapViewOfSection.
void * lvpNtdll = GetModuleBase64( L"ntdll.dll" );
UNICODE_STRING64 sUnicodeString;
__int8 * lvpKernelBaseBase;
__int8 * lvpKernel32Base;
PLDR_DATA_TABLE_ENTRY64 lpsKernel32Ldr;
PLDR_DATA_TABLE_ENTRY64 lpsKernelBaseLdr;

sFunctions.LdrGetKnownDllSectionHandle = GetProcAddress64( lvpNtdll,
	"LdrGetKnownDllSectionHandle" );
sFunctions.NtFreeVirtualMemory = GetProcAddress64( lvpNtdll,
	"NtFreeVirtualMemory" );
sFunctions.NtMapViewOfSection = GetProcAddress64( lvpNtdll,
	"NtMapViewOfSection" );
sFunctions.NtUnmapViewOfSection = GetProcAddress64( lvpNtdll,
	"NtUnmapViewOfSection" );
Solving Issue 3
The next issue we come across, is the issue of properly loading the 64bit kernel32.dll library into the address space of the process. One solution is to patch theRtlEqualUnicodeString function to return false when it’s two arguments are equal to “kernel32.dll”. However, care must be taken to uninstall the hook right after kernel32.dll is loaded since the next time a library is loaded it would reload it, resulting in a rather weirdly looking address space with more than two kernel32.dll libraries loaded.
Our approach is much simpler and requires us to free the memory location of kernel32 and user32 library default base addresses then load them independently using the LdrLoadDll function. In order to do that, the function FreeKnownDllPage() was constructed which receives the section name Unicode string ( the one used in LdrGetKnownDllSectionHandle ) and frees up the memory page by loading the section, walking through the PE header to get the original base address and executesNtFreeVirtualMemory to free up the memory location. Following is the prototype of this function
BOOL FreeKnownDllPage( wchar_t * lpczKnownDllName )
This function is called with the following arguments within the InitializeW64WoW64() init function as shown below:
if( FreeKnownDllPage( L"kernel32.dll" ) == FALSE) return FALSE;
if( FreeKnownDllPage( L"user32.dll" ) == FALSE ) return FALSE;
The function implementation is given below:
BOOL FreeKnownDllPage( wchar_t * lpwzKnownDllName )
{
	DWORD64 hSection = 0;
	DWORD64 lvpBaseAddress = 0;
	DWORD64 lvpRealBaseAddress = 0;
	DWORD64 stViewSize = 0;
	DWORD64 stRegionSize = 0;
	PTEB64 psTeb;
	/*
	** X64Call of WOW64Ext Library - http://blog.rewolf.pl/
	** (Copyright (c) 2012 ReWolf)
	*/
	X64Call( sFunctions.LdrGetKnownDllSectionHandle, 3,
		(DWORD64)lpwzKnownDllName,
		(DWORD64)0,
		(DWORD64)&hSection );

	psTeb = NtTeb64();
	psTeb->NtTib.ArbitraryUserPointer = (DWORD64)lpwzKnownDllName;

	X64Call( sFunctions.NtMapViewOfSection, 10,
		(DWORD64)hSection,
		(DWORD64)-1,
		(DWORD64)&lvpBaseAddress,
		(DWORD64)0,
		(DWORD64)0,
		(DWORD64)0,
		(DWORD64)&stViewSize,
		(DWORD64)ViewUnmap,
		(DWORD64)0,
		(DWORD64)PAGE_READONLY );

	lvpRealBaseAddress =
		(DWORD64)GetModule64PEBaseAddress( (void *)lvpBaseAddress );

	if( X64Call( sFunctions.NtFreeVirtualMemory, 4,
		(DWORD64)-1,
		(DWORD64)&lvpRealBaseAddress,
		(DWORD64)&stRegionSize,
		(DWORD64)MEM_RELEASE ) != NULL ) {
			PrintLastError(); //XXX doesnt work
			return FALSE;
	}

	X64Call( sFunctions.NtUnmapViewOfSection, 2, (DWORD64)-1,
		(DWORD64)lvpBaseAddress );
	return TRUE;
}
For now, all you need to know is that this function calls LdrGetKnownDllSectionHandle with the following arguments:
- lpwzLibraryName - The name of the known section contained withing lpwzKnownDllName.
- bIs32BitSection – False, since we are loading the 64bit version of the library.
- lphSection – A pointer to a local variable which shall receive the section handle
Next, once successfully executed the function calls NtMapViewOfSection to map the library at a random base address ( since the original is already allocated ) with the following arguments:
- SectionHandle – The handle contained withing the hSection local variable that was just retrieved.
- ProcessHandle – Current process handle which is equal to -1.
- BaseAddress – A pointer to a local variable lvpBaseAddress which will receive the base address this section will be loaded at.
- ZeroBits – Not required and set to 0.
- CommitSize - Not required since it is already set.
- SectionOffset – Not required and set to 0.
- ViewSize – A pointer to the local variable stViewSize which is set to 0 and will receive the section size.
- InheritDisposition - Set to ViewUnmap since we don’t plan on creating any child processes.
- AllocationType - Not used and set to 0.
- Win32Protect - Protection set to PAGE_READONLY since we only wish to read from it.
Once executed, the NtMapViewOfSection function will place the base address of the newly loaded section in lvpBaseAddress local variable which is then used as an argument to GetModule64PEBaseAddress() function within w64wow64.c to retrieve the BaseAddress field of the PE Header’s optional header. This address can then be fed to NtFreeVirtualMemory [5] with the following arguments to free up the memory page:
- ProcessHandle – Current process -1.
- BaseAddress – Pointer to the real base address of the module retrieved through the GetModule64PEBaseAddress function.
- RegionSize – A pointer to a local variable which is set to 0.
- FreeType – We wish to free up the memory therefore MEM_RELEASE is provided.
Finally, the NtUnmapViewOfSection is called in order to unmap the section that was just loaded just for the sake of keeping the memory clean.
Once FreeKnownDllPage finishes executing, all you have to do now is load kernel32 using LdrLoadDll which will load it at its original base. The code for that is shown below:
sUnicodeString.Length = 0x18;
sUnicodeString.MaximumLength = 0x1a;
sUnicodeString.Buffer = (DWORD64)L"kernel32.dll";
if( X64Call( GetProcAddress64( lvpNtdll, "LdrLoadDll" ), 4,
	(DWORD64)0,
	(DWORD64)0,
	(DWORD64)&sUnicodeString,
	(DWORD64)&lvpKernel32Base ) != NULL ) {
		PrintLastError();
		return FALSE;
}
Once kernel32.dll and it’s static dependency KERNELBASE.dll are loaded, we need to call their initialization functions Dllmain located at their EP. To do that all we have to do is retrieve the EntryPoint field from their PE Header and call the Dllmain function with the standard arguments and the DLL_PROCESS_ATTACH flag as shown below:
lvpKernelBaseBase = (__int8 *)GetModuleBase64( L"KERNELBASE.dll");
X64Call( ( lvpKernelBaseBase + (int)GetModule64EntryRVA( lvpKernelBaseBase ) ),
	3,
	(DWORD64)lvpKernelBaseBase,
	(DWORD64)DLL_PROCESS_ATTACH,
	(DWORD64)0 );

X64Call( ( lvpKernel32Base + (int)GetModule64EntryRVA( lvpKernel32Base ) ),
	3,
	(DWORD64)lvpKernel32Base,
	(DWORD64)DLL_PROCESS_ATTACH,
	(DWORD64)0 );
Finally, once the libraries are loaded and in order to make the functional, there is one small detail that needs to be taken care of. Each library’s Ldr data table entry contains two fields that are modified by the loader right after a library is loaded. However, in the case of kernel32 and KERNELBASE those are not set. The fields which we are referring to are the LoadCount field which needs to be set to -1 in order to lock in the library, and the Flags field which needs to have the LDRP_ENTRY_PROCESSED and LDRP_PROCESS_ATTACH_CALLED flags set. To do that, we make use of the GetModule64LdrTable() function within w64wow64.c which receives a Unicode string of the library name ( the one matched in the BaseDllName entry within the LDR_DATA_TABLE_ENTRY structure ) and returns a pointer to the data table entry. Next, all we have to do is apply the mentioned modifications as shown below:
lpsKernel32Ldr = GetModule64LdrTable( L"kernel32.dll" );
lpsKernel32Ldr->LoadCount = 0xffff;
lpsKernel32Ldr->Flags += LDRP_ENTRY_PROCESSED | LDRP_PROCESS_ATTACH_CALLED;

lpsKernelBaseLdr = GetModule64LdrTable( L"KERNELBASE.dll" );
lpsKernelBaseLdr->LoadCount = 0xffff;
lpsKernelBaseLdr->Flags += LDRP_ENTRY_PROCESSED | LDRP_PROCESS_ATTACH_CALLED;
This concludes the solution to the problem with loading and initializing kernel32.dll within the 64bit mode of a wow64 application. From this point on ( given that any other initializations are made ) you can execute any kind of code you see fit.
Loading an External 64bit Payload DLL (HeavenInjector)
Finally, once kernel32.dll gets loaded, the environment is ready to accommodate any external libraries which can be loaded using the LoadLibrary function. For the purposes of this POC code a payload library has been coded which makes use of the CreateRemoteThread API function to inject a library in a 64bit application. The payload library name is payload.dll and is included, along with it’s source code in the file attached to this post.
The payload code loads this library using LoadLibrary and calls the exported function InjectLibrary.
Finally, the POC as a whole is consisted of the following files:
- heaveninject.exe – 32bit Executable which receives as arguments a 64bit process id and the library pathname to inject into that process. It switches to 64bit using the w64wow64 library, loads payload.dll using the exported function LoadLibrary64A from within w64wow64 and executes the InjectLibrary function who’s pointer is retrieved using GetProcAddress64 again from within the w64wow64 library.
- payload.dll – A 64bit library responsible for injecting a library into the 64bit process.
- a.dll – A POC Hello World library which is injected into the process.
Final Notes
The provided proof of concept code is experimental and might require some additional coding to support some external system libraries that might not be initialized properly.
Conclusions
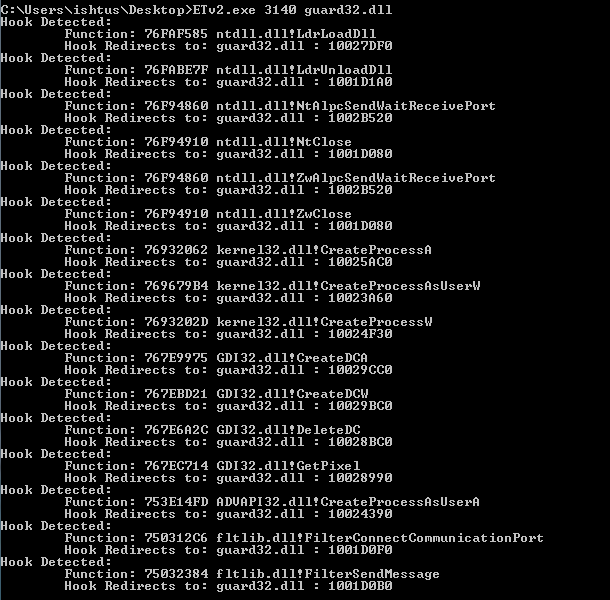
In conclusion to this rather enormous post, we note that the techniques described above can be used or abused as an anti-reverse engineering technique on 32bit applications rendering the code executed in 64bit inaccessible by a 32bit debugger such as Ollydbg. Additionally, this technique can also have devastating results on usermode sandbox or hooking technologies that might install hooks on 32bit system or application libraries. Thank you for reading :).
Downloads
W64oWoW64 Library: https://github.com/georgenicolaou/W64oWoW64
HeavenInjector: https://github.com/georgenicolaou/HeavenInjector
POC Video for HeavenInjector: http://www.youtube.com/watch?v=Z1c_OrW7VaQ



Recent Comments